意大利Sergio Piano的临床病例报告

塞尔吉奥·皮亚诺
在我们所生活的充满挑战的时代,应用有效的解决方案已成为基础,这些解决方案可以为我们的患者带来信心并在我们的实践中提供出色的体验。当有指征时,立即将种植体植入新拔牙槽中可以减少治疗时间和成本,维护牙龈组织并增加患者的舒适度。此外,在我们的治疗中实施数字工作流程可以带来即时性带来的许多优势,同时提高结果的精度和质量;更重要的是,降低了所谓的 COVID-19 传播的风险,因为从规划到最终修复体的制造,与牙科实验室的沟通都可以数字化进行。然而,不仅要执行仔细的决策过程来定义我们的临床方法和工作流程,而且还要为我们的治疗选择适当质量和设计的材料。
以下案例报告描述了一位抱有很高期望的年轻女士彻底改变笑容的过程。其中包括立即将种植体植入新的拔牙槽中,以及立即进行种植体负重以取代无望的上乳尖牙。像这样的临床案例也得到了Straumann® Smile in a Box™(一种灵活的治疗计划和制造服务)的支持。
由 Roxolid® 制成并涂有 SLActive® 表面的 Straumann® BLX 种植体与数字工作流程相结合,为我们带来了精确和优质的结果;使我们能够通过应用有效的治疗方案立即植入种植体并提供美观的临时和最终修复体设计来满足患者的所有需求。
初始情况
一位健康的 30 岁女性患者就诊于我们的牙科诊所,其主诉是采用保守且可预测的治疗方法更换左上乳尖牙。她还要求在治疗的各个阶段进行临时固定康复,并改善额部的美观。
口外检查中,面部评价显示面部对称、比例匀称。微笑分析显示中线矢状面与微笑中线重合,上切牙和尖牙的暴露率为90%(图1)。微笑还显示侧切牙形状不同,与对侧恒尖牙相比,左上乳尖牙更短、更窄、颜色更黄(图2-4)。
口内检查中,乳牙处可见大量角质化牙龈,整体口腔卫生状况良好(图5-7)。

Fig. 1: View of the patient before the treatment.

Fig. 2: Frontal view of the patient’s smile.

Fig. 3: Right lateral view of the patient’s smile.

Fig. 4: Left lateral view of the patient’s smile.

Fig. 5: Intraoral frontal view

Fig. 6: Intraoral view: The discrepancy between upper canines and lateral incisors is clear. Note that the deciduous tooth is shorter than the contralateral, both at the occlusal and at the gingival side.

Fig. 7: Magnification of the deciduous tooth: A wide amount of keratinized gingiva is shown.
功能分析显示尖牙引导由侧切牙和第一前磨牙提供,而乳尖牙不受影响(图8)。

Fig. 8: The functional analysis revealed that the canine guidance was given by lateral incisor and...
锥形束计算机断层扫描 (CBCT) 的放射线检查显示,乳牙根部极度缩小,左上恒尖牙阻生,乳牙部位有厚厚的皮质骨和足够的骨小梁,以及在那里放置植入物的可行性(图9-10)。

Fig. 9: Cone Beam Computed Tomography (CBCT) exam shows the presence of the impacted canine.

Fig. 10: CBCT showed a thick cortical bone and adequate trabecular bone in the deciduous tooth site, as well as the feasibility of placing there an implant.
治疗计划
经过仔细检查临床和影像学结果,我们获得了以下治疗方案:
一个。拔除乳牙并进行正畸治疗,将阻生尖牙重新定位在正确的位置,并重新对齐门牙,以改善微笑外观。
b.拔除乳牙和拔除阻生尖牙。愈合后,进行种植体定位,用种植体支撑的牙冠替换犬齿,并对右侧切牙进行贴面,以改善微笑外观。
c.拔除乳牙并将种植体放置在现有的骨骼中并立即安装修复体,以保持良好的美观外观。种植体骨整合后,最终种植体支持的牙冠和右侧侧切牙的贴面。
我们根据患者的需求对每个方案进行了评估。当我们寻求最保守和有效的方法时,我们最好的选择是在位置 23 放置拔牙后种植体和临时修复体,使永久受影响的尖牙留在其位置,因为这样可以缩短治疗时间并改善患者的情况发病率和美观(图11)。

Fig. 11: Decision making process
在治疗计划中,识别和考虑病例的复杂程度和潜在风险也很重要。 SAC 评估工具(基于 ITI SAC 分类)可以成功用于解决此问题。通过使用此评估,临床医生可以通过引入与患者相关的数据(例如全身状况、局部因素等)和加载方案来遵循逐步的在线程序。最后,将根据提供的数据创建风险概况。在 SAC 分类中,这种特殊情况被视为“复杂”(图 12-13)。

Fig. 12: Tool evaluation – SAC classification.

Fig. 13: Following the SAC Classification, this specific case is considered as “complex”.
最终决定使用计算机引导的计划和手术 (coDiagnostiX®) 及无翻瓣技术,立即使用 Straumann® BLX® ø4.5 mm SLActive® 8mm Roxolid® 和位置 23 上的即时修复体来治疗患者。我们的治疗计划的基本原理基于以下事实:
· 根据要求,可以为患者提供非侵入性手术方法,允许在整个治疗过程中使用固定的临时牙冠。
· 可以减少治疗的总时间。
· 在垂直骨可用性有限的情况下,使用计算机引导方法将确保种植体植入所需的精度。
· 由于其特殊的设计和表面,BLX® 种植体的使用将保证即刻种植体植入和临时修复体所需的最佳稳定性,尽管种植体部位的长度有所缩短。
· 有利的部位解剖结构和适当数量的角化牙龈的存在将降低美学并发症的风险。
· 角化牙龈的数量也将允许在放置临时牙冠时开始调理犬齿周围的软组织。
为了改善笑容并考虑到患者的要求,计划在左侧尖牙进行种植治疗后,用陶瓷贴面修改右侧侧切牙的形状。
对此,整个治疗流程分为8个阶段:
1. 初步数据采集:口腔内和口腔外照片、数字印模(DWOS Virtuo Vivo™)和CBCT检查。 (图14)。

Fig. 14: Digital impressions (DWOS Virtuo Vivo ™) are part of preliminary data acquisition along with intra...
2. 临床案例的美学分析,通过模型预先可视化最终结果。该模型基于与用于计算机评估的牙齿 23 理想形状和用于最终饰面的牙齿 12 理想形状相关的数字蜡型的创建。 (图15-17)。

Fig. 15: Esthetic analysis.

Fig. 16: Diagnostic wax-up

Fig. 17: It is important to analyze the integration of new tooth shapes in the patient’s face. Comparing the image related to the initial situation with the planned one, it is clear that the smile has been evidently improved. Being the patient really satisfied, the wax-up related to this dental display will be used...
3. 在 coDiagnostiX® 规划软件中处理 Dicom(CBCT 检查)和 STL(光学印模和数字蜡型)数据,以便仔细规划种植体植入并设计手术导板。 (图18-19)。

Fig.18: Planning the case step-by-step with coDiagnostiX®.
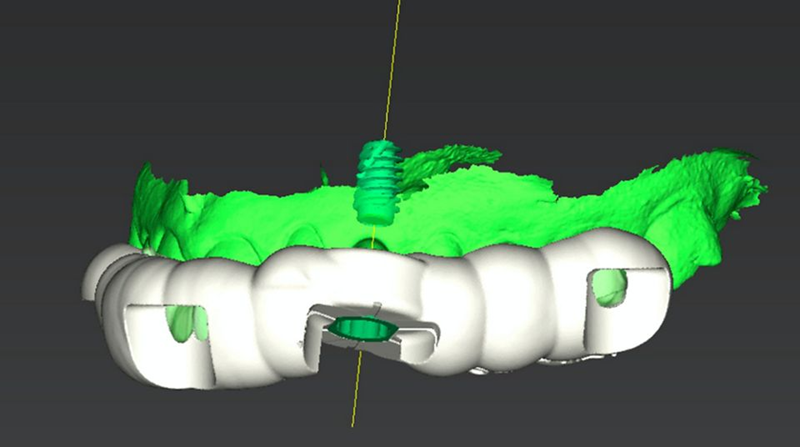
Fig 19: Planning the surgical guide.
4.通过coDiagnostiX®计划生产印刷手术导板和树脂模型(图20-21)。

Fig. 20: In accordance with the STL file produced in coDiagnostiX®, the surgical guide was printed.

Fig. 21: The guide seated on the printed model to verify the precision of the procedure.
5. 牙科实验室基于数字蜡型(在树脂打印模型上)制作临时牙冠(图 22-24)。

Fig. 22: Lateral view of the printed model: Note that the shape of the provisional canine crown is now in line with the adjacent teeth.

Fig. 23: Provisional crown.

Fig. 24: The occlusal view shows the provisional abutment and...
6. 采用无翻瓣技术和临时牙冠定位引导种植体植入。
7. 愈合后,用临时冠调理软组织。
8. 使用 BLX 种植体上的螺丝固位牙冠和 12 号牙齿的陶瓷贴面进行最终修复。
手术过程
患者在犬尖对应的区域进行了局部麻醉浸润(图25)。乳牙的拔除过程非常简单,牙根几乎完全被吸收(图26-28)。

Fig. 25: Anesthetic infiltration in the area corresponding to the canine apex.

Fig. 26: Plier in position for the extraction procedure.

Fig. 27: The extraction resulted in a simple procedure being the root of...

Fig. 28: Occlusal view of the extraction socket.
拔出后,将手术导板放入患者的口腔中,因为通过在特定位置创建的窗口来验证其稳定性和精度非常重要(图29)。

Fig. 29: After the extraction, the guide was finally checked in the patient’s mouth: It is important to verify the stability and the precision through the...
放置导板并验证配合后,专用手术器械组即可使用(图 30)。

Fig.30: Dedicated set of surgical instruments for the BLX implant guided surgery
如使用说明中所述,执行钻孔程序直至位于钻头本身的停止处。该患者的方案考虑将 Straumann® BLX® ø4.5mm、长度 8 mm 放置在软骨中,仅需要 3 个钻头(图 31)。

Fig. 31: Printing of the surgical protocol. This represents the plan to be used during implant placement. It drives the choice of the drills that must...
首先使用铣刀钻头为后续钻头的精确加工创建一个平坦的表面(图 32),然后使用导向钻(直径 2.2 毫米)(图 33),最后使用2.8mm 钻头(图 34)。

Fig. 32: After the guide placement, the milling cutter bur was used with the purpose of creating a flat surface for the precise work of the further drills...

Fig. 33: Use of pilot drill (2.2 mm diameter)

Fig. 34: Use of 2.8 mm drill
根据 CoDiagnostiX® 规划期间所做的选择,选择并放置了直径 4.5mm、长度 8mm 的 BLX®(图 35 - 36)。

Fig. 35: In accordance with the choice done during coDiagnostiX® planning, a BLX with 4.5 mm diameter...

Fig. 36: A detail of the pickup of the implant: the pin placed in the apical part of the implant was gently...
种植体在准备好的骨位点上以完美的引导接合到套管中(图 37),专用的 BLX® 转移件将种植体驱动到正确的位置(图 38)。种植体植入和移除导板后的咬合视图显示了最佳的 3D 种植体位置(图 39)。

Fig. 37: The implant ready to be engaged into the sleeve for the perfect guidance in the prepared bone site.

Fig. 38: The dedicated BLX transfer piece drove the implant in the correct...

Fig. 39: Occlusal view after the implant placement and the removal of the...
尽管可用骨量减少,但种植体稳定性仍可能达到 35n/cm 的扭矩值,这使得可以立即放置假体(图 40)。将直径为 3.8 毫米、牙龈高度为 1.5 毫米的定制临时基台用螺钉固定在种植体顶部(图 41)。然后,用棉球保护临时基台的烟囱,以避免在后续步骤中堵塞螺钉的入口。然后将临时牙冠放入透明面罩内;在用树脂填充牙冠后,通过透明面罩将其固定到位,以便与临时基台连接。树脂聚合后,拧下临时牙冠(图 42),牙冠和基台之间的空间填充树脂,然后进行调整,直到获得适当的紧急轮廓(图 43)。

Fig. 40: Despite the reduced amount of available bone, it was possible to reach a 35 n/cm torque value for the implant stability...
Fig. 41: The provisional abutment, shortened and sandblasted by dental lab, was...
Fig. 42: After resin polimerization, the temporary crown was...
Fig. 43: Image of the crown once screwed on the analog, vestibular side.
调整后,将临时牙冠放置在患者口腔中(图44),并拍摄术后X射线图像,以确保种植体和临时修复体的精度(图45)。

Fig. 44: After the refinements, occlusion was checked in the...
Fig. 45: Post-op X-ray images showing the...
假肢手术
在 3 个月的随访中,患者的软组织愈合良好,并且在前几个月内没有出现任何并发症(图 46)。
Fig. 46: Note the nice emerging profile of the temporary crown; ready for the final prosthetic phases.
因此,理想的临时牙冠轮廓已为最后的修复阶段做好了准备,包括左侧尖牙的种植体支撑牙冠和右侧侧切牙的陶瓷贴面。为此,使用硅掩模作为指导准备牙齿 12:首先,重新创建初始模型,然后使用硅掩模(在其顶部制作)来验证陶瓷贴面所需的厚度(图47)。

Fig. 47: The lateral incisor was treated with veneer to improve esthetics and avoid ortho treatment. This was an alternative solution offered to patient. As a first step, the mock-up was made once again and a silicon mask, created on top of it and cut in the middle, was used as a guide during the preparation of the tooth. This...
然后,使用 Virtuo Vivo™ 口内扫描仪进行数字印模,并通过此目标将专用扫描体拧在 BLX® 种植体顶部,并将牵引绳放置在牙齿 12 周围以标记线准备(图 1)。 48)。几分钟后,获得该区域的数字印模(图 49)。

Fig. 48: Final digital impression: A dedicated scan body was screwed on top of BLX implant and a retraction cord was placed around the tooth...

Fig. 49: Final digital impression: a screenshot of the data acquisition with the intraoral scanner...
然后,将与印模相关的 STL 文件导入 Dental Wings 实验室建模软件中。种植体虚拟地插入模型中,直径为 3.8 毫米、牙龈高度为 1.5 毫米的 Variobase® RB 放置在其顶部(图 50 a 和 b)

Fig. 50a and b: the STL files related to optical impression were imported in Dental Wings lab modeling software. The implant was virtually inserted...
Fig. 50a and b: the STL files related to optical impression were imported in Dental Wings lab modeling software. The implant was virtually inserted...
然后,对前庭侧陶瓷铣削后待贴面的氧化锆牙冠进行造型。一旦完成此步骤,就以此为参考生产氧化锆牙冠(图51)。铣削氧化锆牙冠和陶瓷贴面后,使用复合水泥将牙冠固定在 Variobase® 上(图 52)。然后,对最终的牙冠进行仔细抛光并调整以适应患者口腔中的位置(图53-54)。

Fig. 51: Modeling of the zirconia crown to be veneered after milling on the vestibular side with ceramic. Once this procedure is completed, the zirconia crown will...

Fig. 52: After the milling of the zirconia crown and its ceramic veneering, the crown was fixed on the Variobase® by...

Fig. 53: Vestibular view of the final crown.

Fig. 54: Palatal view of the final crown.
与此同时,12号牙齿的陶瓷贴面也已准备好并准备进行粘接。两种最终修复体均采用打印树脂模型接收,这使我们能够直观地看到最终结果(图 55-56)。

Fig. 55: Printed resin model with ceramic veneer and crown in position.

Fig. 56: Occlusal view of the crown on the model: note the exact positioning of the screw hole due to the precise implant placement with...
对于陶瓷贴面的粘接,绝对干燥的区域至关重要。因此,用牙坝隔离所有前牙区域并确定预备体的终点线(图57-58)。

Fig. 57: Isolation of the operating field with dental dam for the cementation of the ceramic veneer: for the long-term success of the procedure it is...

Fig. 58: A detail illustrating the finishing line of the preparation: It was perfectly visible and ideal for...
然后,对牙齿进行调节以保护相邻牙齿,并使用可流动复合材料粘合陶瓷贴面(图59-60)。

Fig. 59: Acid-etching of enamel: Note how the adjacent teeth were protected from the injury of...

Fig. 60: Cementation of the ceramic veneer with...
最后用聚四氟乙烯牙线保护螺钉头,然后用复合材料填充螺钉通道(图61-62)。

Fig. 61: After the tightening of the crown at 25 n/cm, the screw head was protected by using a teflon floss and the screw channel was filled...

Fig. 62: Final occlusal view.
治疗结果
患者和我们的团队对最终结果在健康、美观和功能方面都非常满意。即使详细分析,也很难识别出最终的修复体(图63)。

Fig. 63: Frontal view of the final result.
在这一点上,我们可以说我们满足了患者的所有需求和期望,并且与基线情况相比(图 64),我们可以看到一个很大的改进。

Fig. 64: Before and after the treatment: Note how the smile of the patient was improved simply by...
新的笑容和谐地融入了患者的脸上(图65-66),最后,她参与了每年一次随访的维护计划。

Fig. 65: The pleasant smile of the patient

Fig. 66: New smile is harmoniously integrated in the...
致谢
亚历山德罗·贾科梅蒂 (Alessandro Giacometti),牙科技师